How Foundations Get Replaced
The most common misunderstanding about the house is how the foundation replacement worked. Most people are under the impression that the house was lifted to allow access to the foundation, when in fact it stayed at the same elevation during the process. And how does that work, anyway? I figured I would draw some pictures and try to explain it as a whole, visually, rather than verbally.
First, there are two basic concepts you need to understand about foundations and basements.
First: the foundation bears downward on the soil from the footing. It sounds simple, but it can be hard to grasp. The soil around the foundation doesn't do anything but cover the foundation up, to protect it from frost heaves (where those are an issue) or to keep it out of sight.
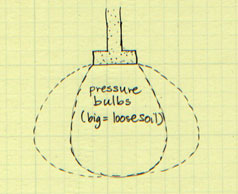
The foundation basically just spreads the weight of the house out over its width, making what engineers call a "pressure bulb" in the soil. In loose, sandy soil like we have in Alameda, you get a very wide pressure bulb. In heavy clay soils, you get a more vertical bulb. If you remove soil in the bulb, you make it harder for your foundation to hold your house up. Do not do this.
Second: soil pushes sideways on basement walls, because in large quantities, granular solids behave like fluids.
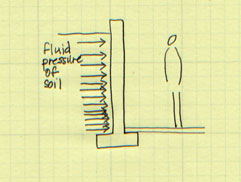
If you want to see this in action, get some brown sugar and smoosh it with a spoon. It will bloob up around the spoon as if it were peanut butter. Anyway, all liquids, and granular solids in large amounts, exert fluid pressure outward in all directions. That's why water balloons are round, and that's why if you dig a really big hole, the walls are liable to fall in on you and bury you if you don't hold them back somehow.
Anyway, to the process:
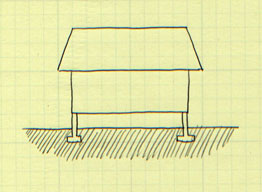
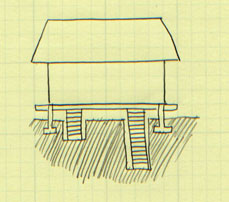
Here we have our starting point: a house on an old foundation that needs to be replaced. The owners of this theoretical house are also going to put in a half-basement, the poor suckers. But they're not digging in the rainy season of an El Nino year, lucky bastards.
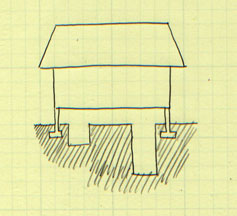
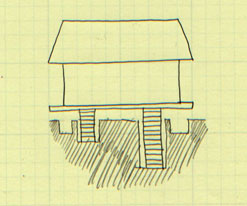
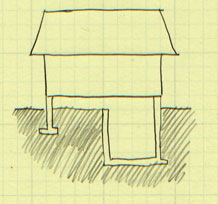
The first step is to dig holes to put the cribbing in. The upper hole is at the level the replacement footing will sit at, while the lower hole is at the level of the bottom of the basement floor. Basically, you remember that pressure bulb? While the house is on the cribbing, we don't want to be close to thinking of touching the soil in that bulb.
Notice that we're playing fast and loose with the pressure bulb of the existing footing. That's because I draw the picture too small: you would not put a hole inside that pressure bulb, because when you are digging the hole you are under the house and if it falls it will suck for you really, really fast.
See it in person:
Holes for cribbing
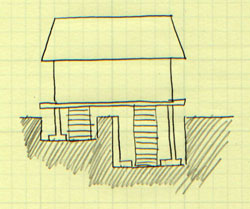
The next step is to put the cribbing in. This is sometimes called shoring. There's a large beam under the house (well, several) held up by the stacks of cribbing. Notice that the house stays at the same level as it was before. The whole thing is wedged tight to the house at its original elevation.
See it in person:
Cribbing in place under the house
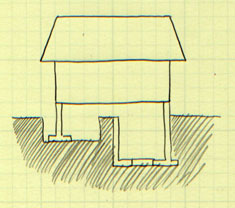
With the cribbing in place and wedged tight, you are free to bust out the old foundations and haul them off (or dump them in a huge pile in the back yard and front yard, for your clients to deal with later). The cribbing can support the house as the old foundations are removed.
See it in person:
Foundations removed
Then you finish excavation. Foundations need to sit on undisturbed soil, so generally during a replacement the contractor will dig down a little further than the original foundation to get a nice spot to build on. If you're in a very loose soil, you're going to need to hold the walls of soil back somehow, because they want to collapse inward.
See it in person:
Excavation
Foundations gone

The next part is the fun part: building the new foundations. Notice that the basement floor needed to have a hole left in it for the cribbing to stay, because nobody's moving that sucker with a house sitting on it. You have to wait a while for the concrete to get to working strength (cured enough that you can put your house on it and not have a big awful mess).
See it in person:
Basement floor
Walls
Simple foundations
Once the new foundation is attached to the house, you can remove the cribbing. The hole in the basement floor gets plugged up. You're in the home stretch!
See it in person:
Cribbing removal
The last step is backfilling (sharp-eyed readers will notice I misdrew the previous drawing and backfilled around half the basement, and am too lazy to go back and re-draw for perfection). Backfilling serves to cover up the big ugly hole, reduce the amount of stuff you have to haul off to a landfill, and in an earthquake it will push the house sideways as the whole earth moves (you want the house to go sideways, if only because every other house in the neighborhood is also going sideways and houses have lousy crash test results). It doesn't hold the house up at all.
See it in person:
Backfill
Then you're done! And you can spend the rest of your life digging bricks out of the yard!
Technorati Tags: engineering, foundation replacement, renovations
posted by ayse on 02/28/06